Photomontage
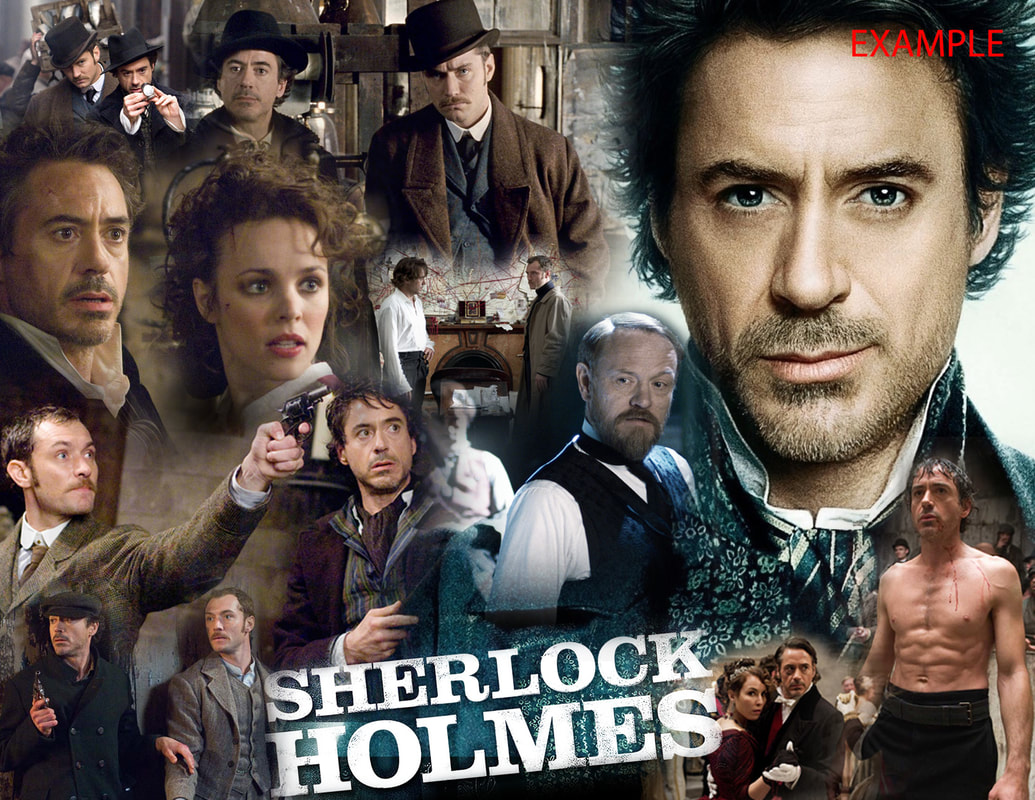
A photomontage is an image made by combining parts of different photos. Movie posters (EXAMPLES) which advertise and promote interest in the movie created by Graphic Designers are a great place to see this type of work.
PROJECT OBJECTIVE: Students will use digital photo manipulation, Principles of Art (Contrast, Balance, Emphasis) and Art Skills: Composition, Problem Solving
Directions
Create a photomontage combining at least 12 but no more than 15 images into a new image revolving around a theme. This theme should be a personal interest of yours. For example, you could make a photomontage of your favorite:
Important Project Notes:
Pick something that interests you. Pay attention to the composition, craftsmanship and content. These are specific areas that you will be graded on for this project. See definitions of these in the Project Rubric below.
All images used MUST be school appropriate. Please check with me if you are unsure on these photos. An F will be given if you choose inappropriate photos!
PROJECT OBJECTIVE: Students will use digital photo manipulation, Principles of Art (Contrast, Balance, Emphasis) and Art Skills: Composition, Problem Solving
Directions
Create a photomontage combining at least 12 but no more than 15 images into a new image revolving around a theme. This theme should be a personal interest of yours. For example, you could make a photomontage of your favorite:
- hobby
- sports team
- athlete
- musician or band
- movie
- actor
- historical events or individuals
- college or university
- your family
- great vacation spots
- nature
- animals
Important Project Notes:
Pick something that interests you. Pay attention to the composition, craftsmanship and content. These are specific areas that you will be graded on for this project. See definitions of these in the Project Rubric below.
All images used MUST be school appropriate. Please check with me if you are unsure on these photos. An F will be given if you choose inappropriate photos!
Watch the Video Tutorial to see how to create a photomontage.
(This video has AUDIO. Use your earbuds to listen)
Watch this Video - IT HAS AUDIO
Plug-in your earbuds to the computer.
See me if you don't have your earbuds.
(This video has AUDIO. Use your earbuds to listen)
Watch this Video - IT HAS AUDIO
Plug-in your earbuds to the computer.
See me if you don't have your earbuds.
Step 1
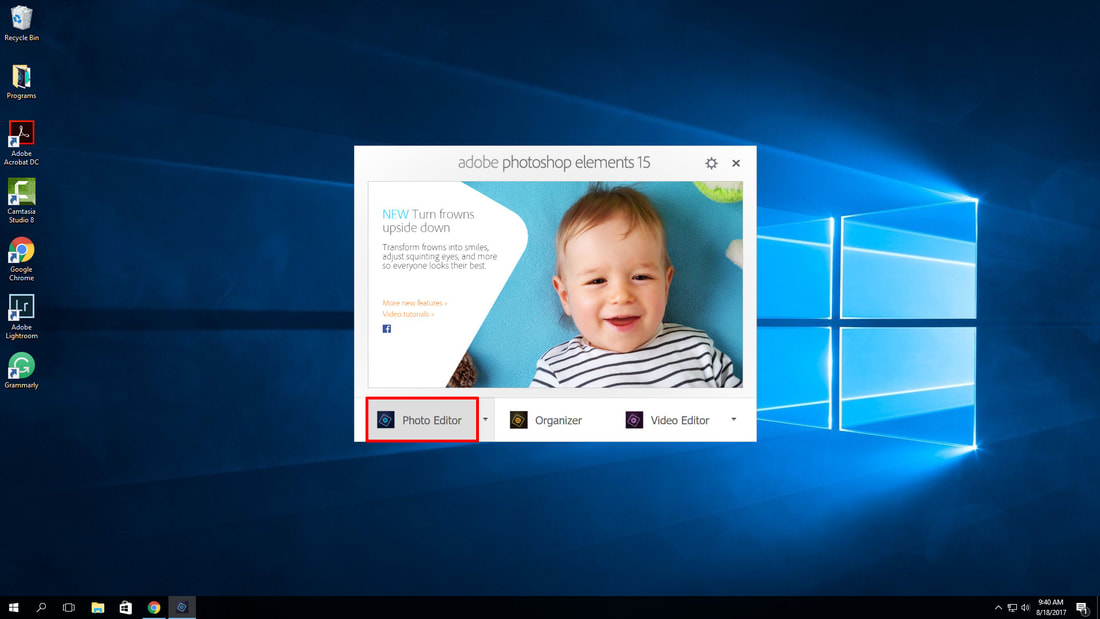
Open Photoshop Elements 15 and then click on the Photo Editor button
Open Photoshop Elements 15 and then click on the Photo Editor button

|
|
Step 2
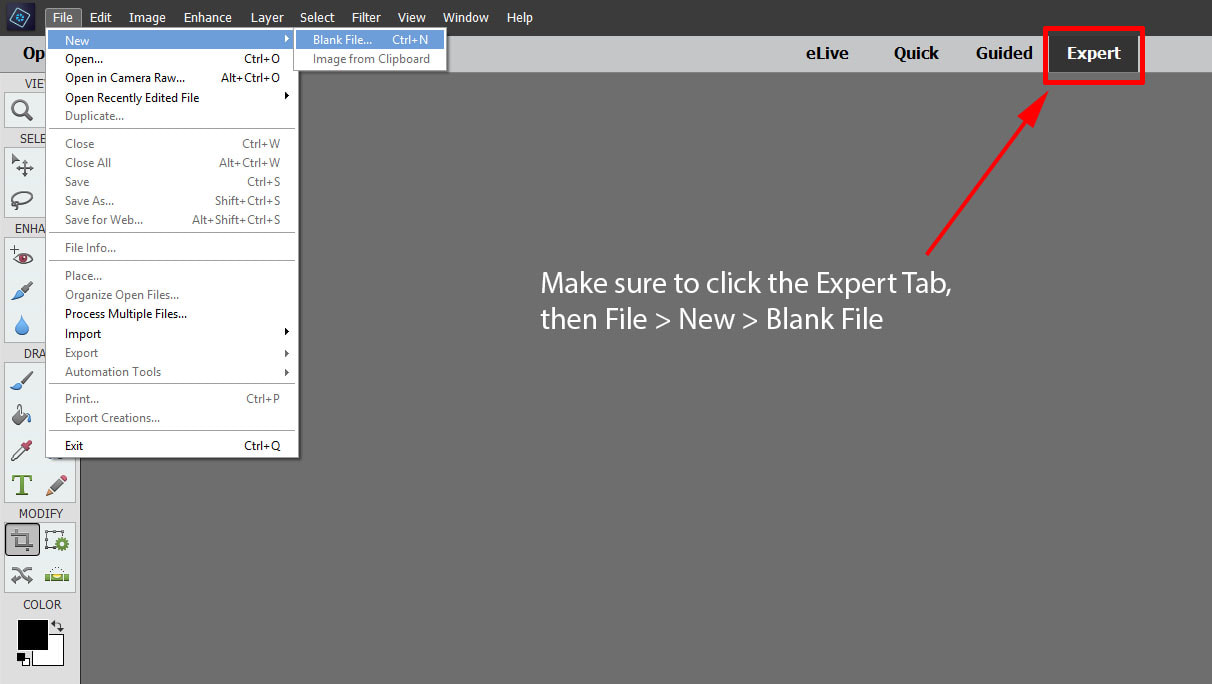
1. Click the EXPERT TAB
2. File > New > Blank File
1. Click the EXPERT TAB
2. File > New > Blank File
Step 3
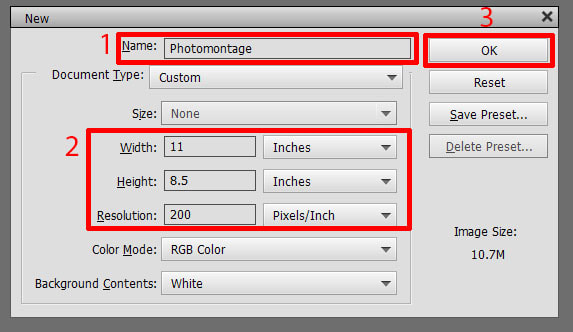
Enter a Name : Photomontage
Enter the Size dimensions seen below.
Click the OK button
Enter a Name : Photomontage
Enter the Size dimensions seen below.
Click the OK button
Step 4
A new blank document will be made that will look like this:
A new blank document will be made that will look like this:

Make the Canvas bigger and smaller by doing the following:

Step 5
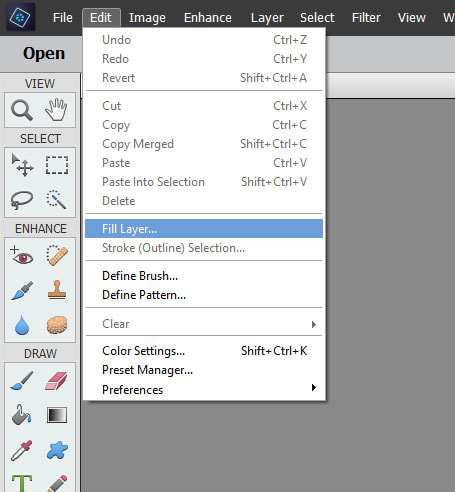
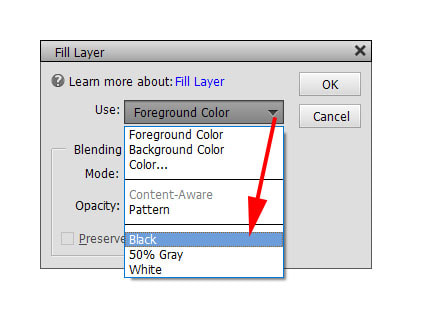
Change the background to Black. Edit > Fill Layer
|
|
The white background now has been turned black. This will make the photos stand out a little bit more.

Step 6
With your selected topic decided on, go online and search Google Images on that topic
Do an Advanced Image Search and narrow down your photos by going to Search Tools > Size > Larger then > 1024 x 768
Right mouse click and select Copy
Minimize the Internet and go back to Photoshop Elements 10
With your selected topic decided on, go online and search Google Images on that topic
Do an Advanced Image Search and narrow down your photos by going to Search Tools > Size > Larger then > 1024 x 768
Right mouse click and select Copy
Minimize the Internet and go back to Photoshop Elements 10
Step 7
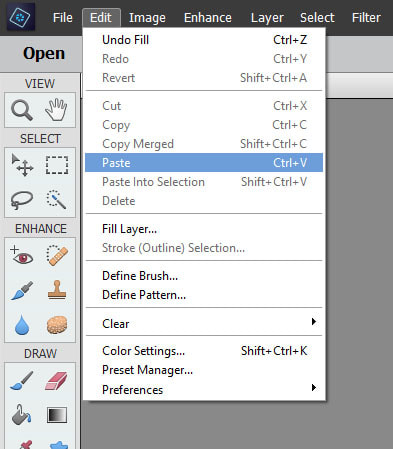
Back in Photoshop Elements select Edit > Paste
Back in Photoshop Elements select Edit > Paste
Step 8
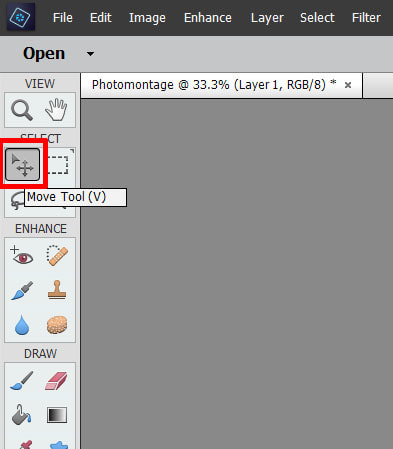
Move your images to different areas on the background with the Move Tool
Move your images to different areas on the background with the Move Tool
Step 9
Re-size and make images smaller inside the document background.
Click and drag inward from corner and click green check mark to commit to new size.

Make sure you have 1 Very Large, 5-6 medium and 3-4 small images in this project.
Start with the Largest photo, then medium photos, and finally the smallest photos.
Below is an example of what a large, medium and small photo should look like:
Start with the Largest photo, then medium photos, and finally the smallest photos.
Below is an example of what a large, medium and small photo should look like:

Step 10
The Layers palette lets you adjust and work with all the images you will place on the background.

Step 11
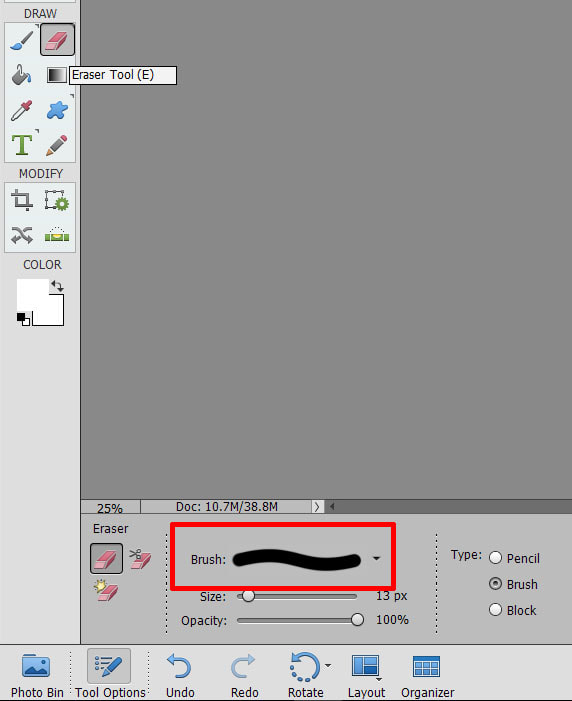
Select the Eraser Tool
Open the Brush presets window to see the different erasers
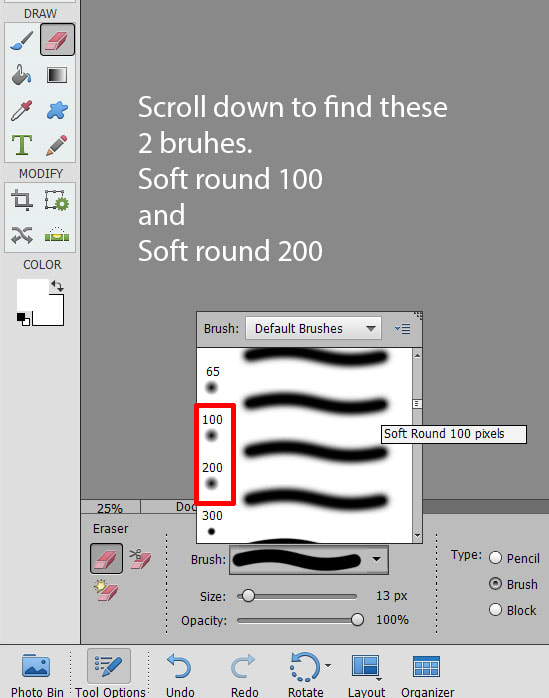
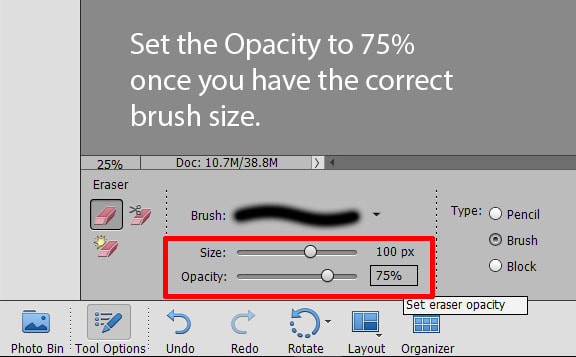
Step 12
Use a Soft Round 100, 200 or 300 pixel eraser with the Opacity at 75%
|

|
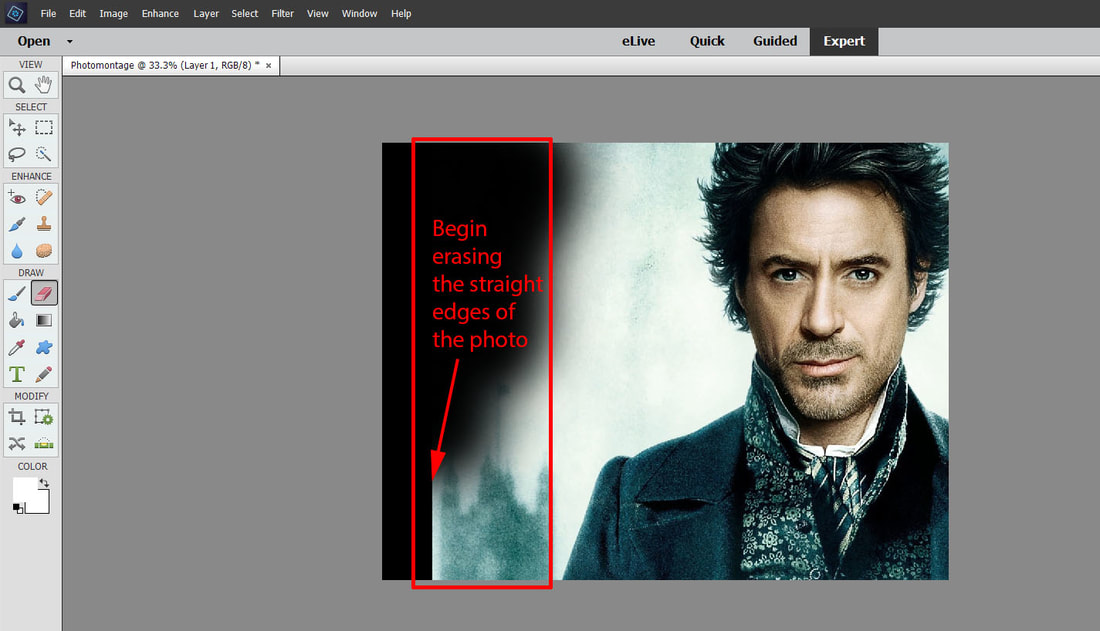
Step 13
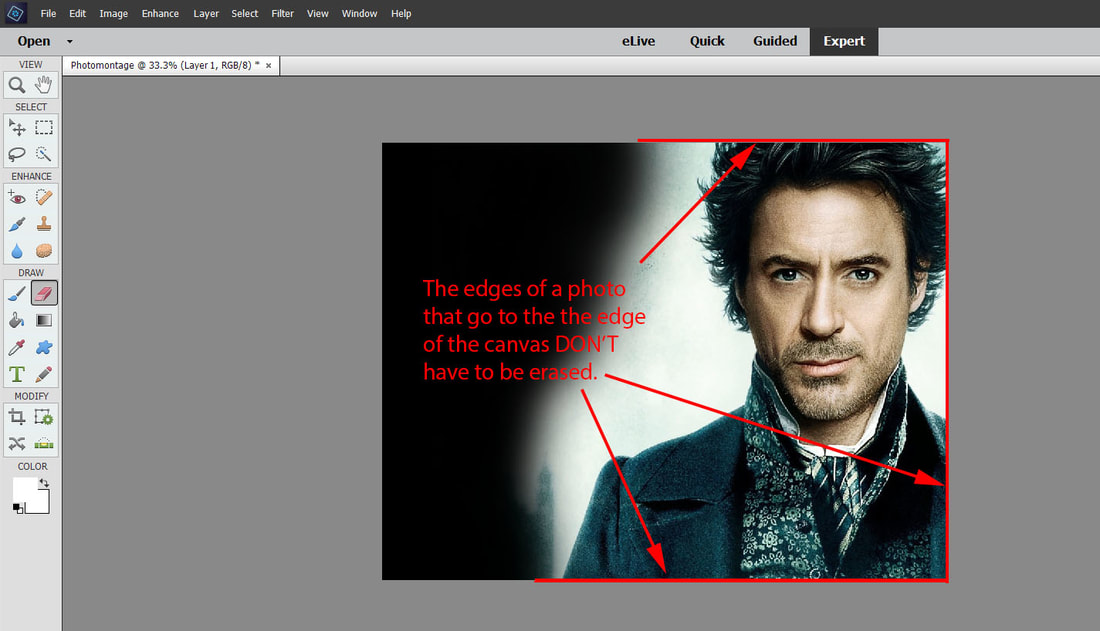
Begin erasing along the straight edges of the photo.
Example of continuing this process (pasting a photo, resizing, and erasing) with more photos seen below.

Example of continuing this process with more photos.
Step 14
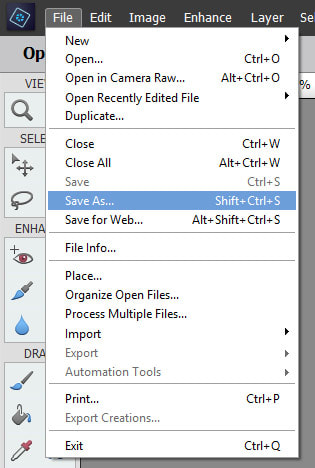
Save your working project file to your H: drive > Google Drive File Stream
File > Save As
Save your working project file to your H: drive > Google Drive File Stream
File > Save As
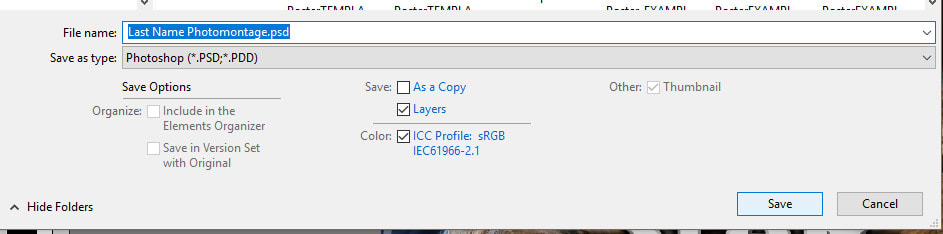
1. Click on the Computer Icon and then select Your H: drive > Google Drive File Stream from the Save in: drop down area.
2. Type out the File Name for the project - Photomontage and Save as type: Photoshop .PSD
3. Click the Save button
2. Type out the File Name for the project - Photomontage and Save as type: Photoshop .PSD
3. Click the Save button
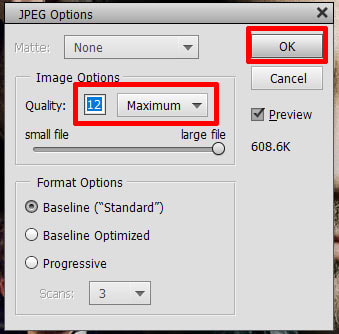
Step 15 - DO THIS WHEN YOU ARE COMPLETELY FINISHED WITH THE PROJECT !
Save your project to your folder on the H: drive > Google Drive File Stream
1. File > Save As
2. Select H: drive > Google Drive File Stream from the Save in: drop down area.
3. Keep the File Name for the project - Photomontage
4. Save as type: JPEG
5. Click the Save button
6. Press OK in the JPEG Options Window

|
|
Please remember these important parts of this assignment
Step 16
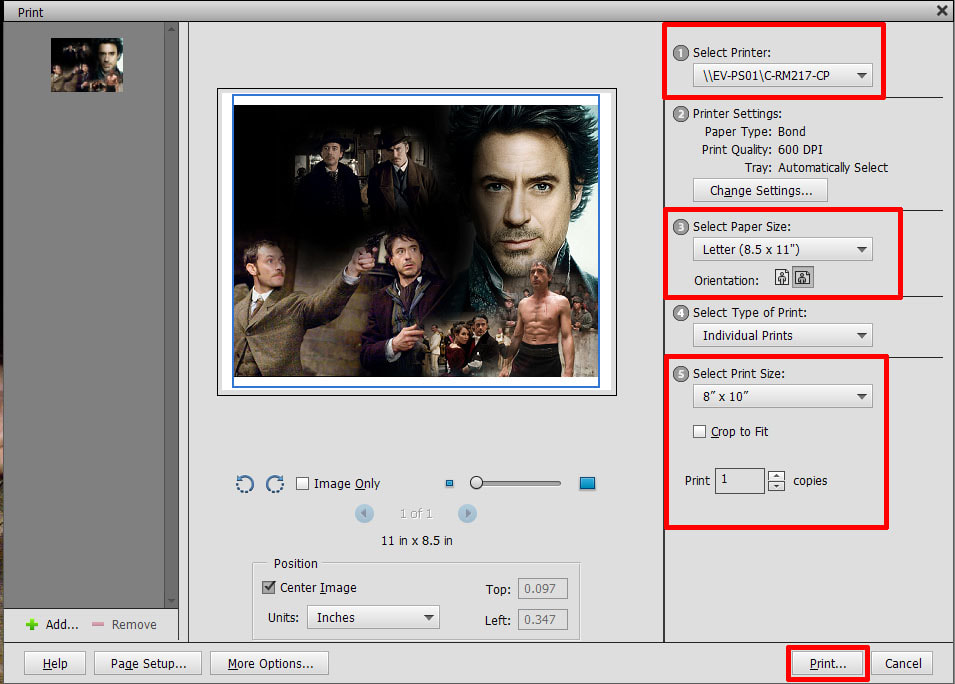
Print out your project following the screenshot below.
Place into class basket for Grading. It will be returned to you for you to keep. 1 printout ONLY!
File > Print or Ctrl + P to bring up the Print Dialog window
Great Student Examples
Poor Student Examples
Project Grading Rubric
Directions - Followed directions as stated in the project objectives. 12 or more images used together with a theme or idea. Student understood and did a good job using the features of the software program for this project.
Composition (layout design) - Selected images and arranging them within the picture space to communicate the artist's ideas, and feelings effectively to the viewer. Placing elements you have selected within your image is very important. Overlap images to get the best results. Using many sizes is also very important. Use large, medium and small images. Not just one big image, with medium ones all around it. Effective use of the elements & principles of design is visible in the composition.
Craftsmanship - How neatly and carefully you did you erase the images? Be sure to use the appropriate eraser type (soft edge) and erase unwanted areas completely using good technique. Don’t leave the edges of the photos you are erasing and make sure they blend together gradually. Also make sure the images are not pixilated, blurry or distorted. Remember to use photos that have thousands of pixels, not hundreds. If they are select a different image from the Internet.
Content - The meaning or message of a work of art. Make sure it is school appropriate please. No guns, hand signs, gang images, skulls, or anything offensive or inappropriate, etc. ASK ME TO CHECK IF YOU ARE UNSURE BEFORE THE IMAGES IS USED!
Effort - Took time to develop and complete the project. Student didn’t rush thru the project just to be done. Good use of class time. Student stayed on task, and used class time well.